The Espresso Upgrade Path: Where Your Money Lands
The espresso upgrade path that actually reaches the cup runs in one order: grinder first, temperature stability second, everything else cosmetic. On my counter I have re-run that ranking for years against the same beans and the same 0.1-gram scale, and the order has never flipped. Spend your next 1,000 kronor where it changes the taste, not where it changes the photo.
Most upgrade advice gets this backwards. It treats the machine as the prize and the grinder as an accessory, when the truth is that a mediocre grinder caps every machine above it. This guide is the map I wish someone had handed me before I started buying gear: where each tier of spend lands, when a modification beats a new purchase, and the exact point at which a dual boiler stops being vanity and starts being justified. It is built from logged, same-day A/B pulls — not from memory of machines I owned three years apart.
The Upgrade Path in One Sentence
Fix the grinder, then stabilise temperature, then buy convenience. That is the whole hierarchy, and it holds because espresso is a process-control problem: the grinder sets how evenly you can extract, temperature sets how repeatably, and the machine body mostly sets how pleasant the process feels. A 12,000 kr machine fed by a 1,500 kr grinder pulls worse shots than a 6,000 kr machine fed by a 6,000 kr grinder — I have tasted that exact swap on my bench and logged it.
The reason this order surprises people is that machines are what shops display and what marketing photographs. The grinder is the unglamorous box doing the actual work. If you read only one of my pages before spending, make it the espresso grinder guide, which lays out why the grinder outranks the machine in plain terms. The rest of this hub assumes that hierarchy and shows you where each tranche of money goes.
Where Each 1,000 Kronor Actually Lands
The first 1,000 kr over a beginner setup buys more cup improvement than the fifth 1,000 kr by a wide margin — espresso upgrades have steep diminishing returns. Early money buys grind quality and basket precision; late money buys steam power and build mass that you taste only at the edges. The curve bends hard, and knowing where it bends is the whole game.
I keep a running map of this on the site because readers ask it constantly: if I had exactly 1,000 kr more, where does it go? The honest answer changes depending on what you already own, which is why I broke it out fully in what 1,000 kronor more actually buys in espresso. The short version: on a stock single boiler with a cheap grinder, that money goes to the grinder every time. On a good grinder with a stock Classic, it goes to a PID or an OPV gauge. Almost never does it go to a shinier machine body.
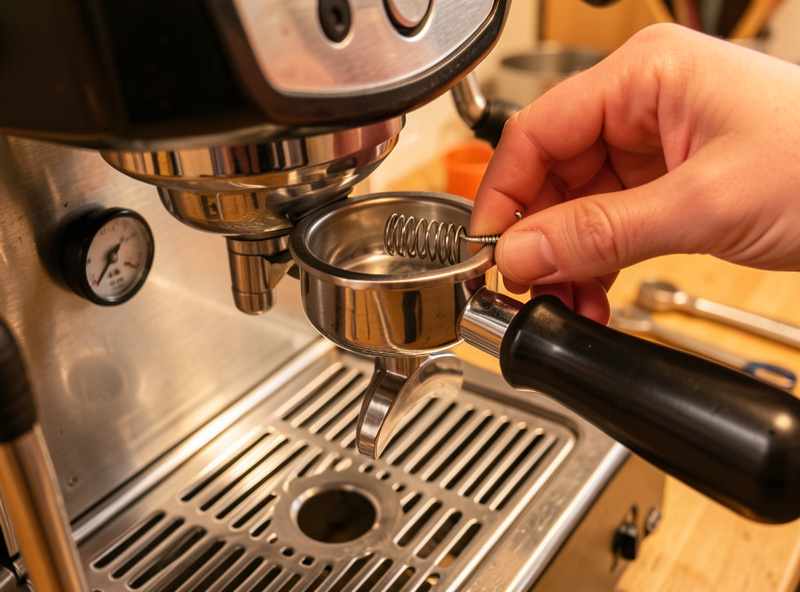
Think of it as tiers rather than a smooth ramp. Tier one is puck-prep and basket: a WDT tool, a precision basket, a real scale. A few hundred kronor buys a measurable jump in extraction evenness. Tier two is the grinder. Tier three is temperature control. Tier four is the machine class itself. Spending out of order — tier four before tier two — is the single most common money mistake I see, and the bottomless portafilter exposes it instantly.
The Grinder Is Usually the Bottleneck
If your shots are inconsistent shot to shot with the same dose and ratio, the grinder is the bottleneck before the machine ever is. A grinder that throws a wide particle distribution guarantees channeling no matter how perfect your puck prep, and no machine — single boiler, HX, or dual boiler — can extract evenly through an uneven bed. This is the diagnosis people resist because the grinder is the part they spent least on.
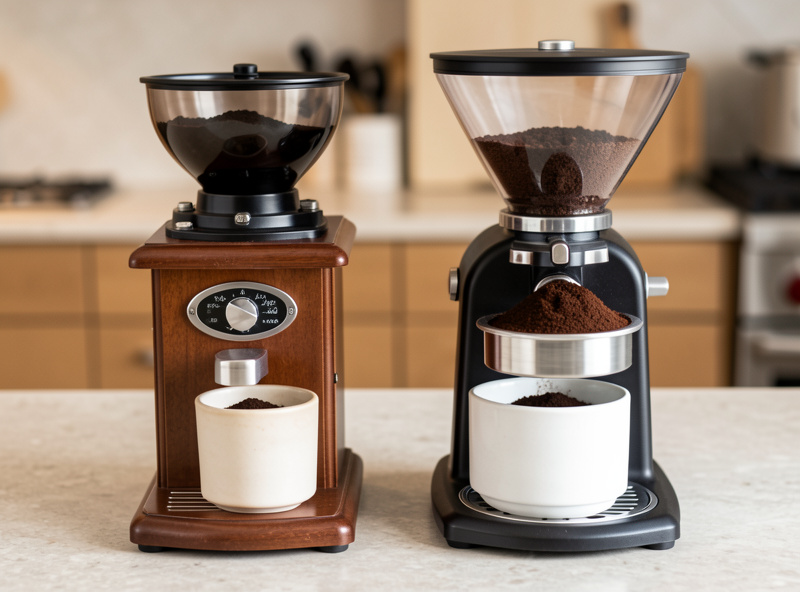
The tell is repeatability. When I swap a budget grinder for a flat-burr single-doser and pull against the same bag, the shot times tighten and the bottomless pour stops spraying. That is burr geometry doing work the machine cannot. I walk through the full diagnosis — how to know it is the grinder and not your technique — in when the grinder is the bottleneck. If you are still choosing one, the best espresso grinder under $300 and flat vs conical burrs cover what your money actually changes in the cup.
Two grinder details swallow more shots than people expect: retention, which stales your dose and muddies the ratio, and worn burrs, which quietly widen the distribution over a couple of years. Both are upgrade-adjacent: sometimes the fix is not a new grinder but new burrs in the one you have.
Modifications Beat Purchases More Often Than You Think
On a single boiler, two modifications return more taste per krona than any machine upgrade: a calibrated OPV adjustment and a PID. Together they cost a fraction of a new machine and they attack the two variables — pressure and temperature — that actually move extraction. This is the part of the path that the upgrade industry has no incentive to tell you, because a modded Classic competes with machines costing three times as much.
The OPV (over-pressure valve) on a stock Gaggia Classic often ships set high — well above the nine bars most people are chasing. Bringing it down to nine bars, or wherever your shots taste best, is a screwdriver job with a pressure gauge portafilter. I did this to my own Classic and it is now my reference for the class. The full procedure, with the safe pressure window and the exact part, is in OPV adjustment explained for the Gaggia Classic.
The PID is the second mod. A stock single boiler runs a crude thermostat that swings several degrees around your target, which is why people learn to temperature-surf. A PID replaces guesswork with a held setpoint. Whether it is worth the money depends entirely on your beans and your patience — I make the full case, including when to skip it, in the PID mod value on a single boiler. For light Nordic roasts that demand higher, steadier brew temperatures, the PID earns its price faster than for forgiving darks.
When the Machine Class Actually Matters
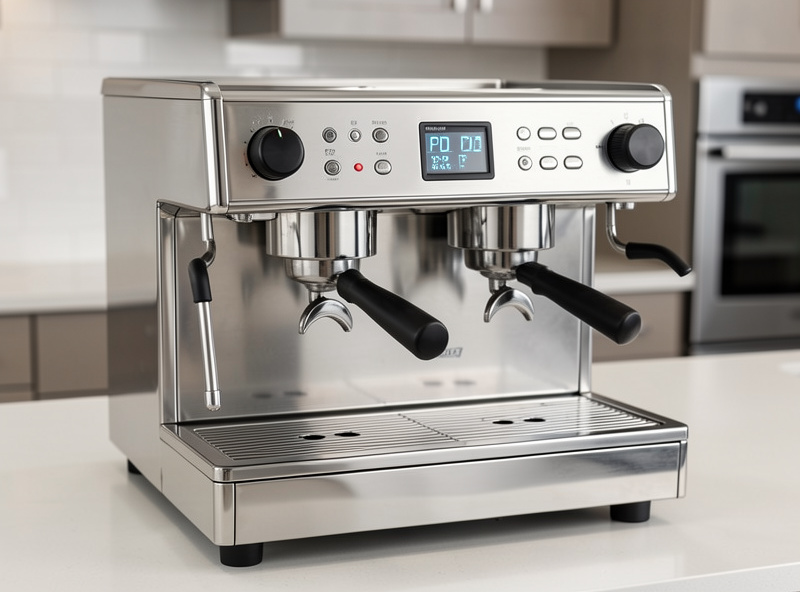
The machine class — single boiler, heat exchanger, dual boiler — mostly determines workflow and milk capability, not raw shot quality. A dialed single boiler and a dual boiler pull comparable espresso into the cup; the dual boiler just lets you steam and brew at once, holds temperature without a flush, and recovers faster between drinks. You are buying convenience and stability, not a different category of shot.
The honest breakpoints look like this. A single boiler is the right first machine for almost everyone — see the first espresso machine guide and my verdict on whether the Gaggia Classic Pro is worth it. The heat exchanger earns its place when you steam often and hate the single-boiler dance, with the cooling-flush routine as the price of admission; single boiler vs heat exchanger lays out that trade. The dual boiler is the endgame for milk-heavy households and light-roast obsessives who want a held temperature with no flush — and I cover exactly when to upgrade to a dual boiler so you do not buy it a year early.
The Upgrade Tiers, Side by Side
Here is the spend map I actually use when readers send me their setup and a budget. It assumes you already have fresh beans and a scale; if you do not, those come before everything in the table.
| Upgrade | Rough cost | What it changes in the cup | Priority |
|---|---|---|---|
| Scale + WDT + precision basket | Low (a few hundred kr) | Extraction evenness, repeatability | First — before anything |
| Better grinder (flat or conical) | Medium–High | Biggest single jump in shot quality | Second |
| OPV adjustment (single boiler) | Very low (gauge + time) | Correct brew pressure, less bitterness | Third, if on a Classic |
| PID mod | Medium | Temperature stability, light-roast control | Fourth |
| Heat exchanger machine | High | Brew + steam together, faster workflow | Only if you steam often |
| Dual boiler machine | Highest | Held temp, no flush, fast recovery | Endgame / milk-heavy |
Read the table top to bottom, not bottom to top. The cheapest rows move the cup most per krona. The expensive rows buy comfort and capability you will appreciate daily but rarely taste as a leap. That is not a reason to never buy them — it is a reason to buy them last.
Buy Used, and Buy the Boring Stuff First
The fastest way to climb the upgrade path cheaply is to buy proven machines used and spend the savings on the grinder. A clean used single boiler or a well-kept E61 machine often sells for half its retail and pulls identically once serviced. The risk is hidden scale and worn seals, which is why I keep a used espresso machine buying checklist for exactly this.
Before any machine purchase, get the cheap, boring upgrades in place, because they make every machine above them perform. A 0.1-gram scale turns vague ratios into a controlled 1:2 ratio you can repeat. Learning to dial in properly, reading shot time as a read-out, and getting your dose and headspace right will extract more from your current machine than most hardware swaps. If you are not sure whether to commit at all yet, renting vs buying runs the honest math.
If you do want a starting machine on a budget, the best espresso machine under $500 and the features that actually matter keep you from paying for marketing. For a basic bench scale to start logging shots, this is the category I reach for: a 0.1-gram espresso scale with timer.
As an Amazon Associate I earn from qualifying purchases.
The Polymath Aside
Dialing an espresso shot and trimming a 3D printer’s first layer are the same loop: change one variable, read the result, log it, repeat. The reason the upgrade path looks the way it does is that you can only improve the variable that is currently limiting you. Buy a dual boiler while your grinder is the bottleneck and you have spent a fortune to hold the wrong variable steady. The 0.1-gram scale under my portafilter is the same scale discipline as every other bench I run — espresso is just the calibration you drink first each morning.
That instinct — find the limiting variable, fix it, re-measure — is what keeps this site honest. Every verdict here comes from a logged, same-bean comparison on one counter, and the upgrade path is simply what those logs say in aggregate. Follow the order and your money lands in the cup. Skip the order and it lands on the counter, looking expensive.
Reading the Diminishing-Returns Curve
Every krona you spend on espresso buys less cup improvement than the krona before it, and the curve bends sooner than the marketing implies. The jump from a blade grinder to a real burr grinder is enormous. The jump from a good prosumer flat burr to a shop-tier flat burr is real but small, and you only taste it on the cleanest single-origin light roasts. Past a certain point you are paying for grind speed, quieter motors, and prettier housings — not for the shot.
I think about it as three regions. The steep region is where most people live: stock-machine, budget-grinder territory where almost any sensible upgrade pays off loudly. The shoulder is where a competent home setup sits — dialed grinder, stable temperature, good puck prep — and where further spend starts buying refinement rather than transformation. The flat region is the chase: flow-profiling rigs, exotic burr sets, the gear competition baristas report results from. There is nothing wrong with the flat region if you enjoy the craft; just spend there knowing the cup barely moves.
The practical lesson is to locate yourself on the curve before you spend. If you are in the steep region, the table above reads top-down and your money lands hard. If you are already on the shoulder, the honest answer to “what next” is often “nothing — log more shots.” More than one reader has thanked me for talking them out of a purchase because their bottleneck was technique, not hardware.
Water Is the Invisible Upgrade
The cheapest upgrade that changes both taste and machine lifespan is water, and almost nobody counts it as an upgrade. Hard, scale-forming water mutes extraction and slowly clogs the boiler; water with the wrong mineral balance tastes flat no matter how well you dial. Fixing water can do more for a stale-tasting setup than a new grinder, and it costs a fraction.
I treat water as a process input, not a mystery. Start by knowing what comes out of your tap — hardness testing for espresso water takes five minutes and tells you whether you have a problem at all. From there the options branch: the right bottled water if you want zero effort, a third-wave water recipe if you want control, and a clear-eyed view of descaling versus softening for protecting the machine. The full picture lives in the espresso water guide. I keep this strictly to taste and machine protection — no health framing — because that is where my bench actually has authority.
Why it belongs on the upgrade path: a scaled-up boiler drifts in temperature and eventually fails, which silently undoes the PID you paid for. Spending on temperature stability while feeding the machine scale-forming water is spending out of order again. Water first, then trust your thermometer.
Maintenance Is an Upgrade in Disguise
A neglected machine pulls worse than a maintained cheaper one, so basic maintenance is effectively a free upgrade you already own. A clogged shower screen channels. A swollen group gasket leaks pressure. A boiler furred with scale swings temperature. None of these show on a spec sheet, and all of them cap your shots below the hardware’s potential.
The routine is not glamorous and it is not expensive. Backflushing on a schedule keeps the group clean; shower screen cleaning restores even flow; knowing the warning signs of a worn group gasket stops a slow pressure leak before it ruins shots. The whole cadence is laid out in the complete maintenance guide. Treat maintenance as the zeroth tier of the upgrade path: it costs almost nothing and it is the prerequisite for every paid upgrade above it actually delivering.
The Steam and Milk Question
If most of your drinks have milk, the upgrade path tilts earlier toward boiler capability, because steam power and the brew-then-steam workflow are exactly what machine class buys. A single boiler makes you choose between brewing and steaming and forces a wait; that is fine for one flat white in the morning and tiresome for a household of three.
Be honest about your drink mix before you let milk justify a big machine. You can make genuinely good microfoam on a single boiler — I do it daily and the technique, not the boiler count, is what limits most people. Learning to steam milk properly extracts more from a modest machine than upgrading the machine does. Once your technique is solid and you are still fighting the single-boiler dance every morning, that is the genuine signal to move up — first to a heat exchanger, then to a dual boiler if recovery speed and a held brew temperature matter to you.
Three Real Starting Points
The right next purchase depends entirely on where you start, so here are the three setups readers most often describe, with the honest first move for each. None of them is “buy a bigger machine” first.
The new buyer with nothing. Budget split matters most here: put real money into the grinder and buy the machine used or modest. A used single boiler plus a good grinder beats a shiny new machine with a budget grinder at the same total spend. Add a scale and a WDT tool and you have a setup that will out-pull cafés. Start with the first machine guide and a grinder under $300.
The stock-Classic owner. You already have the right machine for the class. Your money goes to the grinder if it is weak, then to an OPV adjustment (nearly free) and a PID. A modded Classic with a strong grinder is, for black-shot drinkers, close to an endpoint. Do not jump to a dual boiler until you have exhausted this.
The dialed single-boiler owner eyeing the endgame. Here the question is genuinely about workflow and milk, not shot quality. Read single boiler vs heat exchanger and when to upgrade to a dual boiler, then buy the convenience you will use every day — not the spec you will admire on the counter.
The Five Most Expensive Mistakes
The upgrade path is mostly about avoiding spend in the wrong place. These are the five money mistakes I see most, in rough order of how much they cost people.
- Buying the machine before the grinder. Caps every shot below the machine’s potential. Fix the grinder first, always.
- Chasing a new machine when the fix is a modification. An OPV adjustment and a PID solve pressure and temperature for a fraction of a new machine’s price.
- Ignoring water. A cheap input that quietly mutes taste and kills boilers — and undoes the temperature control you paid for.
- Skipping the scale and the log. Without a 0.1-gram scale and a shot log you cannot tell whether an upgrade worked, so you keep buying.
- Buying a dual boiler for shot quality. It buys workflow and stability. If you drink black shots off a dialed single boiler, the cup barely changes.
Avoid those five and the path takes care of itself. Every one of them is the same error wearing a different hat: spending on a variable that is not currently limiting you. Find the limiting variable, fix it, re-measure, and let the log tell you what to buy next.
Frequently Asked Questions
What is the single best espresso upgrade for the money?
A better grinder, almost always. On a stock single boiler with a cheap grinder, the grinder is the bottleneck capping every shot. It produces the biggest single jump in cup quality per krona, ahead of any machine swap or modification.
Should I upgrade my grinder or my espresso machine first?
The grinder first. A mediocre grinder throws a wide particle distribution that guarantees channeling no matter how good the machine. Fix grind quality before spending on a fancier machine body, which mostly buys workflow and steam power rather than shot quality.
Is a PID mod or an OPV adjustment more important on a single boiler?
Do the OPV adjustment first because it is nearly free with a pressure gauge portafilter and corrects brew pressure directly. Add a PID second for temperature stability, especially if you pull light roasts that need higher, steadier brew temperatures.
When is a dual boiler actually worth buying?
When you steam milk often and want to brew and steam at once with a held temperature and no cooling flush. For black-shot drinkers on a dialed single boiler, a dual boiler buys convenience and stability, not a meaningfully better espresso.
Can a modified Gaggia Classic compete with expensive machines?
For shot quality, largely yes. An OPV-adjusted Classic with a PID controls pressure and temperature — the two variables that move extraction. It cannot match a dual boiler for simultaneous steaming or recovery speed, but the espresso in the cup is close.
How much should I spend on a grinder versus a machine?
Aim to spend at least as much on the grinder as the machine, and often more early on. A balanced budget split beats pouring everything into the machine, because the grinder sets the ceiling on how evenly any machine can extract.