How to Steam Milk for Espresso: The Complete Guide

Steaming milk well is two jobs done at once: stretching the milk to add air (microfoam) and heating it to the right temperature, both finished before you hit about 60°C. Get the air in during the first few seconds, spin the rest, and stop at 55–60°C. That single rule fixes most home milk.
I steam milk every morning on the same counter where I pull shots, and I have run the cheap single boilers and the dual boilers side by side against the same carton. Most of what gets called “barista milk” is not a magic machine — it is timing and a pitcher angle you can learn in a fortnight. This guide is the map for that whole skill: the gear that actually matters, the universal technique, the temperatures that suit each drink, and the maintenance that keeps the wand from quietly ruining your shots. Each section links out to a deeper spoke guide where the detail lives.
What “steaming milk” actually means
Steaming is two processes stacked into roughly ten to fifteen seconds: aeration (adding air to build foam volume) and emulsification (folding that foam into the body of the milk so it pours like wet paint). On my counter the rule is simple — you stretch first while the milk is cold, then you texture. Stop adding air by the time the pitcher feels lukewarm to your palm, around 37°C, then keep the milk spinning to break the big bubbles down into microfoam.
The thing nobody tells beginners is that good milk is mostly silence and stillness. A loud, screeching, bubbling pitcher is making dish-soap froth, not microfoam. A correct steam is a soft tss for a second or two of stretch, then a quiet rolling whirlpool. If you can read the sound and the whirlpool, you barely need a thermometer. The fundamentals here run parallel to dialing a shot — you change one variable, read the result, and repeat, the same loop I use when I dial in espresso by dose, yield and time.
The three pieces of gear that actually matter
You need a steam wand, a stainless pitcher, and a way to know your temperature. That is the whole list. A pitcher in the right size for your cup does more for your pour than any gadget, and a cheap stick-on or probe thermometer carries you until your hand learns the cut-off. Everything else — latte art pens, fancy tips, milk frothing wands — is decoration until the basics are reliable.
The biggest variable you do not control is steam power, and that is set by your machine class. A single boiler makes steam in short, modest bursts; a heat exchanger or dual boiler holds steam pressure indefinitely and textures a 12oz pitcher in seconds. Knowing which camp you sit in tells you how much milk to use and how fast to work. Here is how the three classes I keep on the counter actually behave on the milk side.
| Machine class | Steam power | Pitcher size that works | Milk-side reality |
|---|---|---|---|
| Single boiler (e.g. OPV-modded Gaggia Classic) | Low, short window | 300–350ml | One drink at a time; wait for the steam-ready light, work fast, texture a single cappuccino’s worth |
| Heat exchanger (E61 group) | High, continuous | 350–600ml | Steam and brew near-simultaneously; easy microfoam; needs a cooling flush before the next shot |
| Dual boiler (e.g. Breville Dual Boiler) | High, stable, adjustable | 350–600ml | Most forgiving; steam pressure never sags mid-pour; best texture-per-krona on the home counter |
If you are on a single boiler, do not despair — you can absolutely pull café-grade microfoam, you just have to respect the smaller steam budget. I wrote a full method for exactly that in the single-boiler microfoam guide, because the technique genuinely differs from what a dual-boiler owner does.
Choosing a pitcher that fits your cup
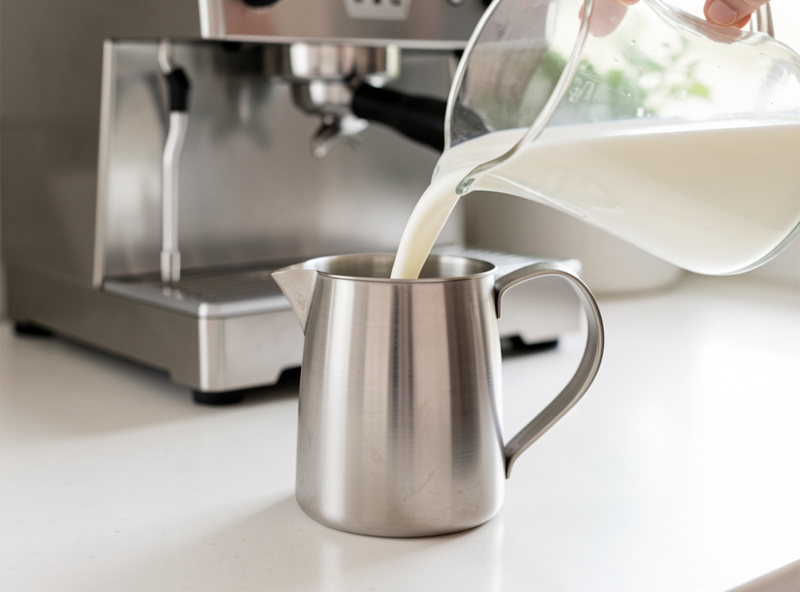
The pitcher should be roughly twice the volume of the milk you are steaming, and the milk should sit at or just below the bottom of the spout before you start. Steam one cappuccino’s worth of milk in a 600ml jug and you get a thin, slopping puddle that is impossible to pour; steam a 12oz latte’s worth in a 350ml jug and it climbs over the rim. Match the jug to the drink and pouring becomes ten times easier.
For most home setups making one or two drinks, a 350ml (12oz) pitcher is the single most useful size, with a 600ml as the second buy for flat whites and bigger lattes. The spout shape matters more than the brand — a tighter, more defined spout gives you control over the stream for latte art. I break down the exact sizes, spout shapes and fill lines in the steaming pitcher size guide, including which jug to buy first if you only buy one.
The universal steaming technique, step by step
Purge the wand, submerge the tip just under the surface, open the steam fully, stretch for two to four seconds while you hear a soft tearing tss, then drop the tip slightly deeper to kill the noise and set up a fast whirlpool. Hold that spin until the pitcher is too hot to keep your hand on the base — that is your cut-off. Close the steam, wipe and purge the wand immediately.
The two errors I see most often are stretching too long (you end up with stiff meringue you can spoon but not pour) and never building a whirlpool (the foam sits in a separate layer and never integrates). The whirlpool is the whole game: it folds the air you added in the first seconds down into the body so the milk becomes one glossy, paint-like liquid. Tap the pitcher once on the counter to pop surface bubbles and swirl it to keep it integrated right up until you pour. This is the same instrumented patience that reading a shot demands — the milk is telling you what it needs if you watch and listen.
Wand position is worth one more sentence because it is where most beginners go wrong. The tip wants to sit just off-centre and barely below the surface during the stretch, then you tilt the pitcher a few degrees and lower it a hair to set the whirlpool spinning around the wall of the jug. Too central and you get a flat boil with no spin; too deep from the start and you never aerate at all. The pitcher does the moving, not the wand — once the steam is open, you adjust the milk up and down against a fixed tip, reading the sound the whole time. Find the spot where a soft tearing whisper turns into a smooth, silent rolling, and you have found the position that machine and pitcher want for that volume of milk.
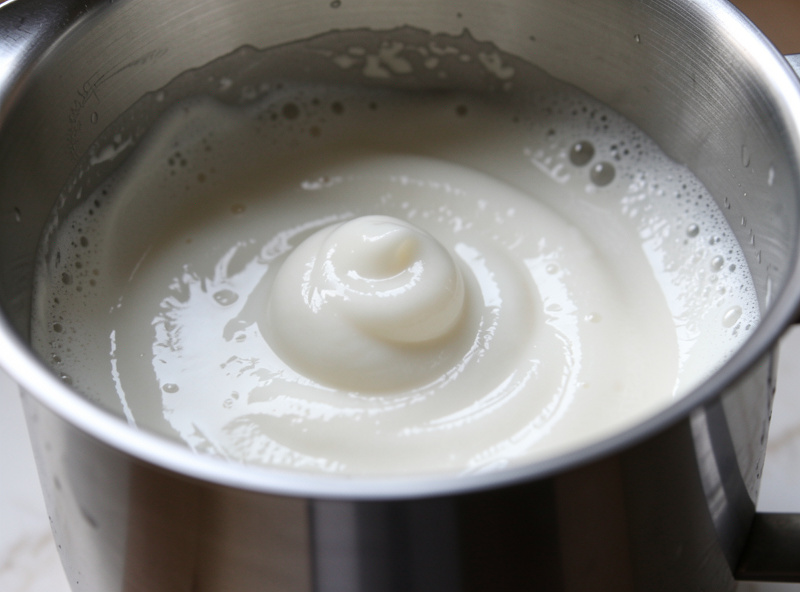
Microfoam, and how to know you have it
Microfoam is milk with thousands of bubbles too small to see individually, giving a wet-paint sheen that folds into the cup rather than floating on it. You know you have it when you swirl the pitcher and the surface shines and rolls like glossy emulsion paint — not when you see visible bubbles or a stiff white cap. Properly textured milk should pour in a smooth, controllable stream.
The honesty test I use is the swirl-and-shine. Stiff, bubbly milk looks matte and lumpy; good microfoam looks like liquid satin and leaves a thin coat on the side of the pitcher as it moves. If you see dish-soap bubbles, you stretched too aggressively or held the tip too high for too long. A single firm tap on the bench plus a few seconds of swirling rescues borderline milk. For texture, whole dairy milk is the most forgiving because its fat and protein stabilise the foam; we will get to plant milks, which play by different rules.
Temperature targets by drink type
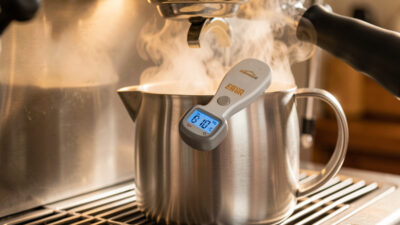
Aim for 55–60°C for almost every milk drink and never exceed 65°C. Past about 70°C the milk sugars stop tasting sweet and start tasting of scalded, eggy off-notes, and the foam structure collapses. A flat white or cortado, where the milk is meant to taste sweet and silky, lives at the lower end — roughly 55°C — while a takeaway latte someone wants piping hot can push toward 63°C.
The reason the ceiling matters is chemistry you can taste: lactose perceived sweetness peaks then falls as you heat milk, and the proteins that hold your foam denature when overheated, which is why scalded milk both tastes worse and pours worse. I stopped using a thermometer years ago and cut off by feel — when the base of the pitcher becomes uncomfortable to hold for more than a second, you are in the right band. If you are still learning the cut-off, a thermometer is cheap insurance. The full per-drink breakdown lives in the milk temperature by drink guide.
Steaming plant milks for espresso
Plant milks foam through added stabilisers and protein rather than dairy fat, so you want barista editions and a slightly lower temperature — around 50–55°C — because most plant milks split or turn thin and watery if pushed as hot as dairy. Oat barista milk is the most dairy-like to texture; soy barista is close behind; almond and coconut are the fussiest and the most likely to separate against an acidic espresso.
The practical difference is that plant milks give you a narrower window: less stretch, a gentler whirlpool, and an earlier cut-off. “Barista” versions exist specifically because they add the protein or gums needed to hold microfoam, and the standard cartons genuinely will not texture the same way. If your oat latte keeps curdling at the surface, the usual culprits are overheating or a very acidic light-roast shot, both fixable. I cover each milk type and the curdling fixes in the plant milk steaming guide.
Your first latte art patterns
Latte art is just controlled pouring: get the milk and the crema to the same glossy consistency, fill the cup low and slow to about half, then bring the pitcher close to the surface and let the milk push a white patch to the top. The monk’s head (a plain dot), the heart, and the tulip are the three patterns every beginner should learn first, in that order. Pattern quality is downstream of milk quality — you cannot pour art with bubbly milk.
I will be honest about my own ceiling here: my latte art is competent, not competition-tier, and that is exactly the right level to teach from because it is reachable. The heart is genuinely a two-week skill if your microfoam is right. The first thing to fix is almost never your pour — it is your milk texture, which is why this whole guide front-loads steaming. Once your microfoam swirls like satin, the first latte art patterns guide walks the heart and tulip step by step.
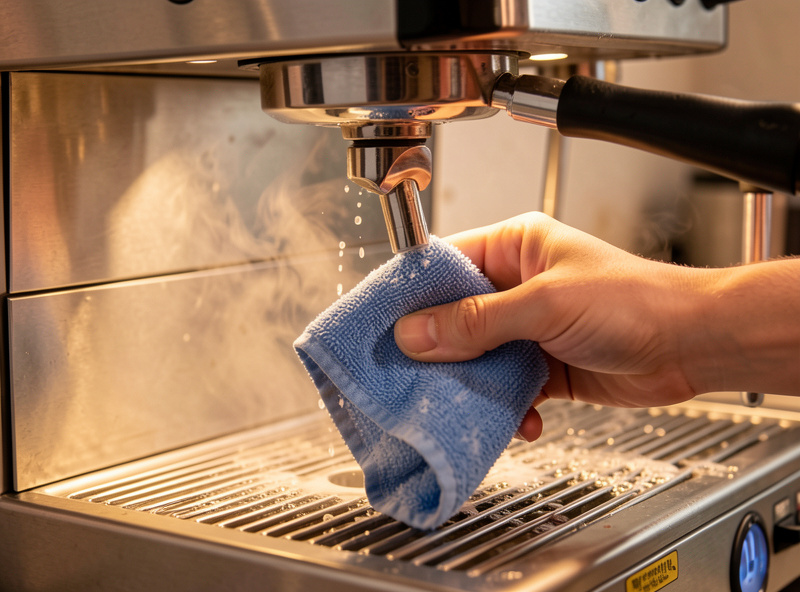
Cleaning the steam wand (the non-negotiable)
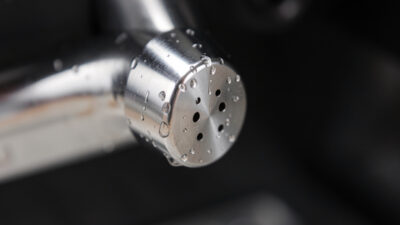
Purge and wipe the wand the second you finish every single drink, because milk proteins bake onto hot stainless in minutes and rot inside the tip if left. The full routine is: purge a burst of steam to clear milk from the inside, wipe the wand down with a damp microfibre cloth, and once a week soak the detached tip in a milk-cleaner solution to clear the holes. A blocked steam tip is the single most common cause of a machine that “lost its steam power”.
This is the maintenance step home users skip and then blame the machine for. Dried milk in the tip narrows the steam holes, which weakens and skews your steam, which wrecks your microfoam — a slow decline people rarely connect to the cause. It is thirty seconds after each drink and five minutes once a week. The complete wand routine, including how to clear blocked holes without damaging the tip, is in the steam wand cleaning guide.
Where the money actually goes
On the milk side the value order is blunt: technique is free and worth the most, a correctly sized pitcher is the first 200 kr you should spend, a thermometer is the next 150 kr until your hand learns, and after that you are buying decoration. A good pitcher and a probe thermometer together cost less than a single fancy tamper and will improve your milk more than any machine upgrade under a dual boiler.
If you want to shop the two things that genuinely move the needle, a well-shaped 350ml stainless steaming pitcher and a fast-read milk thermometer are the whole starter kit. As an Amazon Associate I earn from qualifying purchases. Beyond those, spend your money on better beans and a better grinder — the grinder still outranks almost everything, even on the milk side, because flat, even extraction gives you crema that your microfoam actually wants to integrate with.
How the milk pairs with the shot
Milk forgives a lot, but it does not forgive a bad shot — it just hides it under sweetness for the first sip. The drinks that lean hardest on milk (latte, cappuccino, flat white) still want a balanced shot underneath, which means the right brew ratio and a yield matched to the drink. A cortado on a sour, under-extracted shot tastes sharp no matter how silky the milk; a flat white on a bitter, over-extracted shot tastes of ash through the sweetness.
This is why I treat milk as the last 20% of a drink rather than a rescue for the first 80%. If your milk drinks taste off and your steaming is correct, look back at the shot: grind, dose, time, and whether your pour is channeling, which a bottomless portafilter will expose with nowhere to hide. Dial the shot, steam the milk to 55–60°C with glossy microfoam, pour it close and slow, and you have a café drink on a home counter.
Common milk faults and the fix, in order
Almost every milk problem traces back to one of four causes: too much air, not enough whirlpool, wrong temperature, or a dirty wand. Work through them in that order and you will solve the fault faster than guessing. The reason order matters is that a stiff, bubbly cap (too much air) looks similar in the cup to milk that never integrated (no whirlpool), but the fixes are opposite — one means stretch less, the other means spin more.
Here is the diagnostic sequence I run on my own counter when a drink comes out wrong, framed the same way I troubleshoot a sour or bitter shot — one variable at a time, in a fixed order so you never chase your own tail:
- Stiff foam you can spoon but not pour: you stretched too long. Cut the air phase to two to three seconds and submerge the tip sooner. Aim for a thinner foam layer that disappears into the milk when you swirl.
- Foam sitting in a separate layer on thin milk: you never built a proper whirlpool. Angle the tip off-centre so the milk spins fast, and hold that spin until cut-off. The whirlpool is what folds air into the body.
- Scalded, eggy taste and collapsing foam: you overheated past 65°C. Cut off earlier — when the pitcher base is too hot to hold comfortably for a full second, you are done.
- Weak, spitty, uneven steam: a blocked or dirty tip. Purge, wipe and soak the tip; this is a maintenance fault masquerading as a technique fault.
- Big, soapy surface bubbles: tip held too high above the surface during stretch. Keep it just under the surface so you hear a soft tss, not an aggressive screech.
The deeper point, and the thread that runs through every guide on this site, is that milk is a process-control problem you can taste. You have a small number of inputs — air, spin, temperature, time — and each produces a readable output in the cup. Log what you changed and what happened, the same way I keep a shot log, and within a week or two your hand stops needing the thermometer and your eye stops needing the bubbles to disappear. That repeatability is the whole point: not one lucky café-grade latte, but the same good one every single morning.
Frequently Asked Questions
What temperature should I steam milk to?
Aim for 55 to 60 degrees Celsius for almost every milk drink and never exceed 65. Past roughly 70 degrees the milk sugars stop tasting sweet and the foam structure collapses, giving a scalded, eggy taste. Flat whites sit at the lower end near 55 degrees.
Can I steam good milk on a single-boiler espresso machine?
Yes. A single boiler makes steam in shorter, weaker bursts, so you work with a smaller pitcher of milk, wait for the steam-ready light, and move fast. The microfoam can be just as good as a dual boiler; you simply respect the smaller steam budget and texture one drink at a time.
Why is my steamed milk full of big bubbles?
Big bubbles mean you added air for too long or held the wand tip too high above the surface. Stretch for only two to four seconds while the milk is cold, then drop the tip deeper to build a whirlpool that folds the air into microfoam. Tap the pitcher and swirl to pop any remaining bubbles.
What size milk pitcher should I buy first?
A 350ml (12oz) stainless pitcher is the most useful first buy for one or two drinks. Steam roughly half the pitcher in milk so it sits at the base of the spout before you start. Add a 600ml jug later for flat whites and larger lattes.
Do plant milks steam differently from dairy?
Yes. Plant milks foam through added protein and stabilisers rather than dairy fat, so use barista editions and steam slightly cooler, around 50 to 55 degrees. Oat barista milk textures most like dairy, while almond and coconut are the most likely to split against an acidic espresso shot.
How do I stop milk proteins ruining my steam wand?
Purge and wipe the wand immediately after every drink, before the milk dries. Dried milk bakes onto hot stainless within minutes and blocks the steam holes, which slowly weakens your steam power. Once a week, soak the detached tip in a milk-cleaner solution to clear the holes.
Why does my milk taste sweet but my coffee still tastes bad?
Milk hides a bad shot under sweetness for the first sip but cannot fix it. If your milk drinks taste off and your steaming is correct, look back at the espresso: check your grind, dose, yield and shot time, and whether the pour is channeling. Steamed milk is the last 20 percent of a drink, not a rescue for the shot.
Related Guides in This Cluster
- Microfoam Technique on a Single Boiler — café milk on a modest steam budget
- Choosing a Steaming Pitcher Size — which jug to buy first, and why
- Milk Temperature by Drink Type — the targets for every milk drink
- Steaming Plant Milks for Espresso — oat, soy, almond and the curdling fixes
- Your First Latte Art Patterns — the heart and tulip, step by step
- Cleaning the Steam Wand — the thirty-second routine that protects your steam